目录

  • 1 Student Guide
    • 1.1 Course Description
    • 1.2 Course Goals
    • 1.3 What You Need to Get Started
    • 1.4 Study LabVIEW in MOOC
    • 1.5 Teaching Documents
  • 2 Introduction of LabVIEW
    • 2.1 Student Guide
    • 2.2 Introduction to LabVIEW
    • 2.3 Parts of a VI
    • 2.4 Dataflow
    • 2.5 Example Code
    • 2.6 Creating a new Project and VI
    • 2.7 Knowledge Checks
  • 3 Basic of LabVIEW programming
    • 3.1 Student Guide
    • 3.2 LabVIEW Programming Environment
    • 3.3 LabVIEW DateTypes
    • 3.4 Interface Design
    • 3.5 Debugging Tools & Tips
    • 3.6 Generate Applications and Installation Packages
    • 3.7 Remote Release
    • 3.8 Knowledge Checks
    • 3.9 Exercise-bus Station
  • 4 Loop Structure
    • 4.1 Student Guide
    • 4.2 While Loop
    • 4.3 For Loop
    • 4.4 Automatic Indexing
    • 4.5 Shift Register
    • 4.6 Formula Node
    • 4.7 Exercise-Simple Calculator
    • 4.8 Knowledge Checks
  • 5 Arrays and Array functions
    • 5.1 Student Guide
    • 5.2 Introduction of Array
    • 5.3 Array Elements&indexes
    • 5.4 Array Creation
    • 5.5 Common Array Functions
    • 5.6 Array and Loop Structure
    • 5.7 Array and Waveform
    • 5.8 Sets of Data in LabVIEW
    • 5.9 Working with Single Channel Acquisition Data
    • 5.10 Working with N-channel Acquisition Data
    • 5.11 Additional Array Examples
    • 5.12 Knowledge Checks
    • 5.13 Exercise-Lucky Draw
  • 6 Cluster and Cluster Function
    • 6.1 Student Guide
    • 6.2 Reasons to Use Cluters
    • 6.3 Creating a Cluster
    • 6.4 Disassembling and Modifying Clusters
    • 6.5 Exercise-Digital Tube Display
    • 6.6 Error Clusters
    • 6.7 Comparison of Arrays and Clusters
    • 6.8 Knowledge Checks
  • 7 Graphic Display
    • 7.1 Student Guide
    • 7.2 Waveform Chart
    • 7.3 Waveform Graph
    • 7.4 XY Graph
    • 7.5 Intensity Graph and Intensity Chart
    • 7.6 2D Image Manipulation
    • 7.7 Using Cluters with Charts and Graphs
    • 7.8 Knowledge Checks
  • 8 SubVI
    • 8.1 Student Guide
    • 8.2 Understanding Modularity
    • 8.3 Creating an lcon
    • 8.4 Configuring the Connector Pane
    • 8.5 Documenting a Subvl
    • 8.6 Calling SubVls
    • 8.7 Polymorphic VI
    • 8.8 Re-entrant VI
    • 8.9 Knowledge Checks
    • 8.10 Exercise-NTC_Thermistor
  • 9 Case Structures
    • 9.1 Student Guide
    • 9.2 Case Structure Introduction
    • 9.3 Creating and Configuring Case Structures
    • 9.4 Knowledge Checks
  • 10 Sequence Structure
    • 10.1 Student Guide
    • 10.2 Sequence structure
    • 10.3 Use  Variable
    • 10.4 Flat Sequence Structure
    • 10.5 Stacked Sequence Structure
    • 10.6 Data Transfer Between Frames in Sequence Structure
    • 10.7 Invisible is Better than Tangible  Sequence Structure
    • 10.8 Knowledge Checks
    • 10.9 Exercise-Traffic signal control system
  • 11 State Machine
    • 11.1 Basic Composition of State Machine
    • 11.2 Custom Enumeration Constant
    • 11.3 State Transition in State Machine
  • 12 Producer-Consumer Structure
    • 12.1 Producer-Consumer Cycle
    • 12.2 Composition and Structure
    • 12.3 Creating and Function
    • 12.4 Producer-Consumer (events)
    • 12.5 Producer-Consumer (data)
    • 12.6 Appliance
  • 13 Basic Timing Funciton
    • 13.1 Student Guide
    • 13.2 Timing Funciton
  • 14 Data Acquisition
    • 14.1 NI DAQ
    • 14.2 Temperature Acquisition
    • 14.3 Data Acquisition System Basics
    • 14.4 Serial Device Usage
    • 14.5 Knowledge Checks
  • 15 Data Communication
    • 15.1 Global Variables and Functional Global Variables
    • 15.2 Attribute Nodes
    • 15.3 Call Nodes
    • 15.4 Queues
    • 15.5 Object-oriented   Programming
    • 15.6 VI Server
    • 15.7 External Program Interface
  • 16 Project Design and Development
    • 16.1 Remote Temperature Detection System
    • 16.2 Smart Traffic Light Control System
    • 16.3 Performance Test Systems for Electrical Equipment
    • 16.4 Smart Home System
    • 16.5 Oscilloscope Information Acquisition System
    • 16.6 Simple Parking Management System
  • 17 Display of Students' Works
    • 17.1 Intimate Emotional Instrument
    • 17.2 Vaccine Cold Chain Storage and Transportation Vehicle
    • 17.3 Intelligent Tea Maker
    • 17.4 Smart Belt
    • 17.5 Forest Train Prevention
    • 17.6 Intelligent Pet Collar
    • 17.7 Smart Home System
    • 17.8 Intelligent Medical Care System
    • 17.9 Sensor Pocket Laboratory
    • 17.10 Intelligent Music Player
    • 17.11 Body Fat Scale
    • 17.12 Design of Monitoring System for Lily Greenhouse Based on Arduino
Study LabVIEW in MOOC

Study LabVIEW in MOOC

Regiter in MOOC

The first way

 With PC  

  1. Go to https://www.icourse163.org/

  2. Click “注册”(Creat Account)


  1. Click “手机号登陆”(login in by mobile)

  2. Click “去注册”(Register)


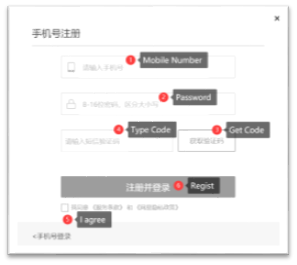
  1. Input Mobile Number.

  2. Input Password,8-16 characters,case sensitive.

  3.  Click “获取验证码”(Get Verification Code)

  4.  Type Verification Code receivedin SMS。

  5. Check “我同意《服务条款》和《网易隐私政策》”(I agree to the terms of service)

  6.  Click “注册并登陆”(Register and log in)


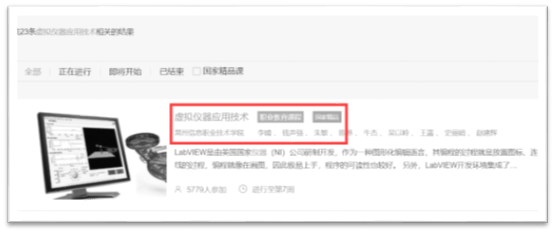
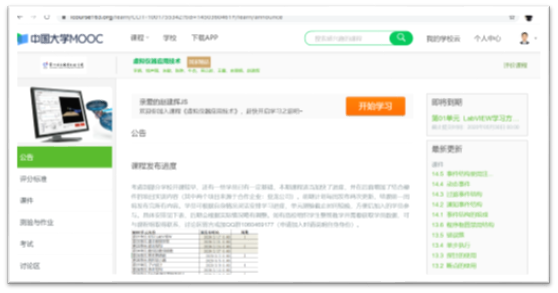
  1.     Type course name “虚拟仪器应用技术”


https://www.icourse163.org/course/CCIT-1001755342

  1.     Click the right course


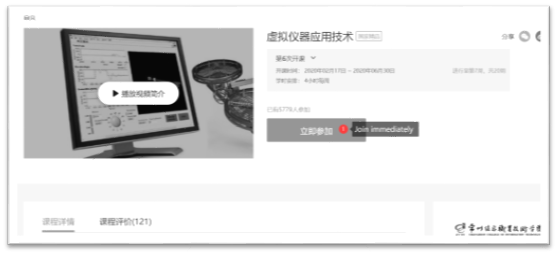
  1.     Click “立即参加”(Join immediately)


  1.     You can study now.


 The second way

  With Mobile


  1. Go to the download page

    https://www.icourse163.org/appDownload.htm?from=undefined,or scan the QR code, or search “中国大学MOOC” in your appstore, download and install.

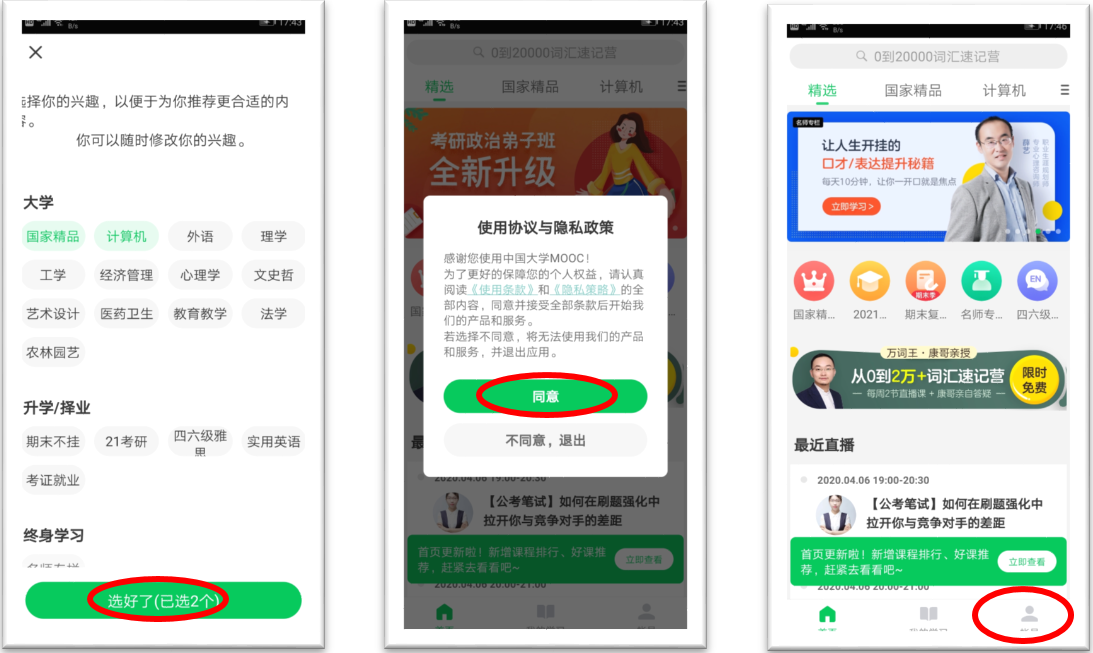
  2. Select at least two interestedlabel and click “选好了”

  3. Click “同意” to agree to the service

  4. Click “账户” bottom right corner


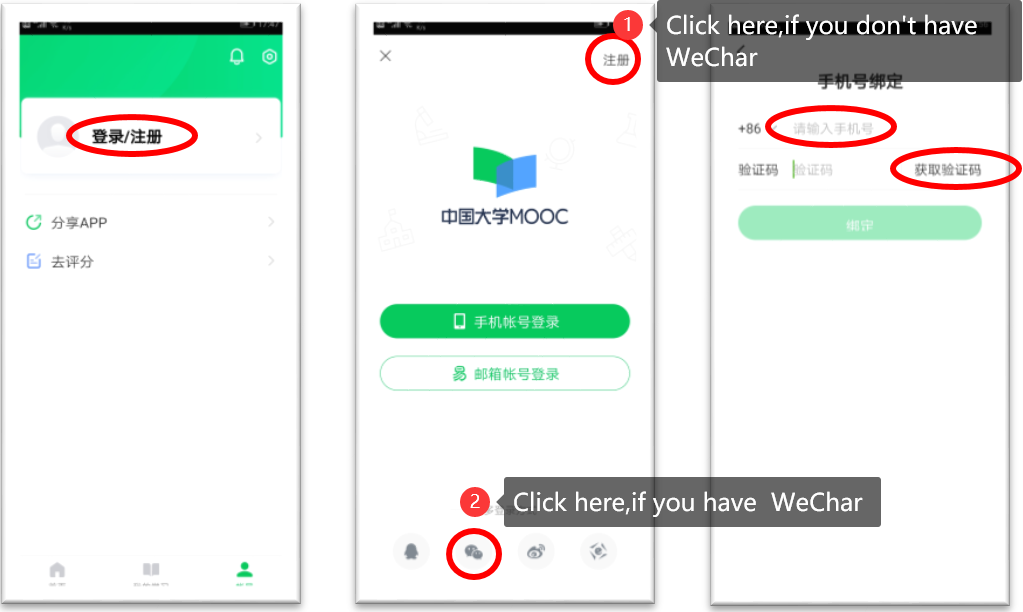
  1. Click“登陆/注册” (Login/Register)

  2. Click “注册” on top right or click  WeChat at bottom

  3. Fill your phone number, click “获取验证码” (Get Verification Code ),fill the verification code in“验证码”,click “绑定”(bind with mobile)


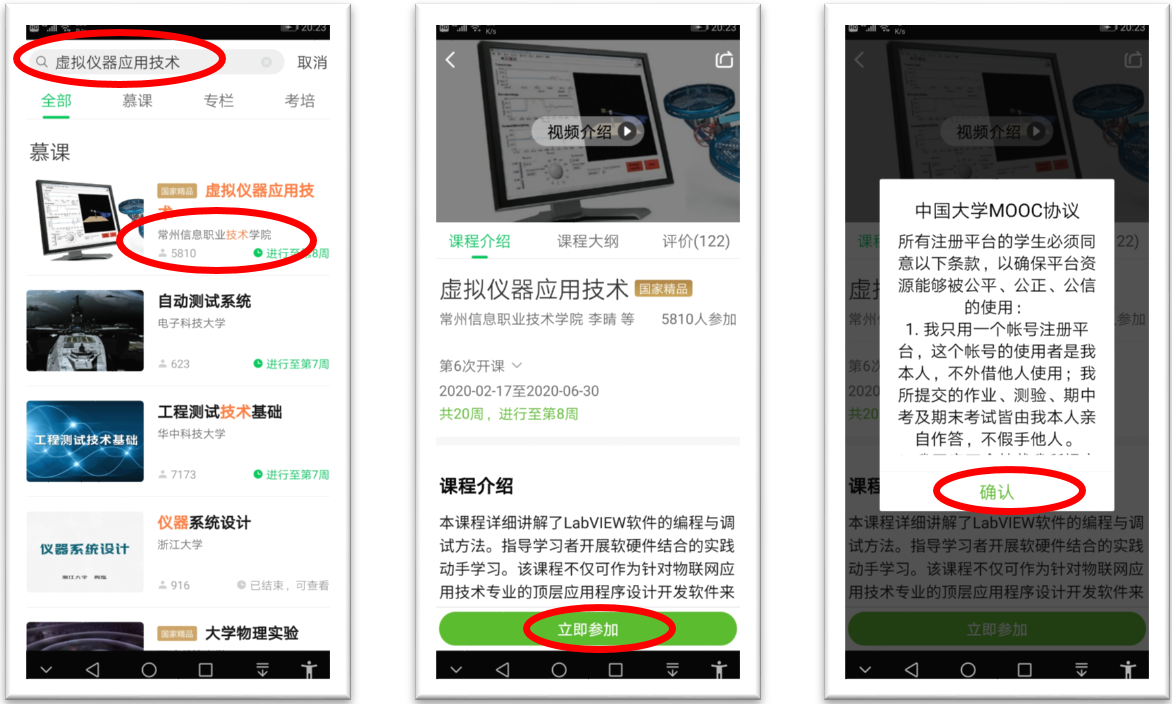
  1. Fill “虚拟仪器应用技术” in the search bar,click the result with “常州信息职业技术学院”

  2. Click “立即参加” (Join immediately)

  3. Read theaggrement and click “确认”


  1.       Youcan study the course now

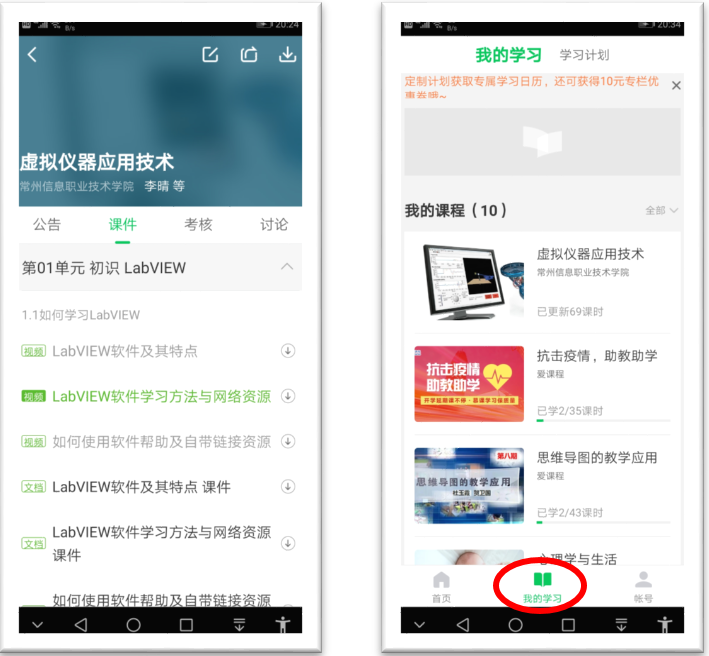
  2.       Youcan find the course in “我的学习”